DVKit: Setting up SystemVerilog Development
18 Jan 2018In my last post on DVKit, I described how Eclipse uses projects to group source files, and uses workspaces to organize the projects and settings for a given development session. In this post, I'll start to dig into the support that DVKit provides for developing SystemVerilog.
DVKit includes the SVEditor plugin (http://sveditor.org), an open source Eclipse plug-in for developing SystemVerilog files. SystemVerilog is an object-oriented language that has similarities to C++ and Java. Unlike C++ and Java, though, SystemVerilog has strong ordering dependencies between files. C++ files can be independently analyzed because each C++ source file must include its dependencies and specify the namespace its content is in (if any). Java is even a bit more structured, requiring the class name and file name to match, and (effectively) requiring the directory structure to match the package namespace structure.
In contrast, all content in a SystemVerilog package must effectively be included in a single file. The pre-processor provides a level of workaround to enable classes to be stored in a separate file from the package file that includes them. However, this all adds up to make setting up source analysis for a SystemVerilog file a bit more detail-oriented than for other source languages.
In this post, I'll walk through setting up an Eclipse (DVKit) project for the UBus example from the UVM-1.2 library. I downloaded UVM here.
Creating a SystemVerilog Project
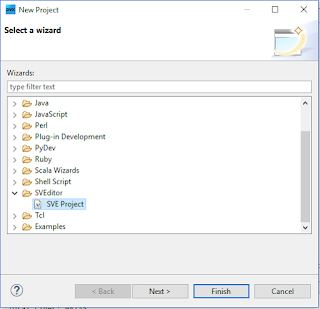
As mentioned in the last post, Eclipse makes it easy to create a project around existing source code. In this case, we know we will be working with SystemVerilog source, so we start by creating a new SVE Project. The wizard is found inside the SVEditor category, as shown below.
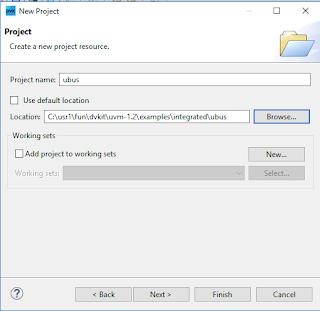
After selecting the proper wizard for project creation, we need to specify the particulars of the project:
Specifically, in this case:
- ubus -- The name of the project
- c:\usr1\fun\dvkit\uvm-1.2\examples\integrated\ubus -- The location of the ubus project within the UVM tree
Specifying Root Files
Since the ubus project contains existing sources, we next want to specify the root files so they can be indexed. SystemVerilog files need to be parsed in a very specific order, so it's important to only process the top-level files.
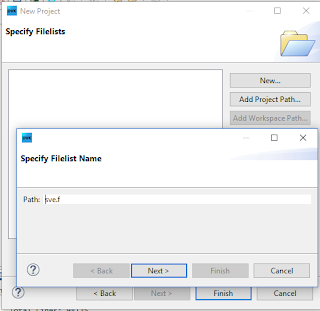
To do this, we first create a New Filelist on the Filelists page of the new SVE Project wizard. The filelist can be named anything, but the default (sve.f) is fine.
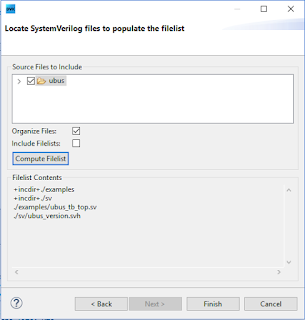
The next page is where the magic happens.
- Select the check box next to the 'ubus' project. This will cause all files with a SystemVerilog suffix (.sv, .svh, etc) to be selected
- Click on the 'Compute Filelist' button. This pre-processes all source files and eliminates any files that are included by another.
- The resulting root files are displayed in the Filelist Contents box
Checking out the new Project
At this point, we've specified the root files in our project in such a way that the SVEditor plug-in can locate and parse them. We can now click Finish on the wizard and see the completed project.
Hmm... Okay, so we have a problem. Seems some macros from the UVM library can't be located. Of course, this isn't really surprising given than we haven't told the SVEditor plug-in to parse the UVM files.
Adding External Sources
Eclipse provides several ways to reference project-external source files. The easiest in this case is to just add the UVM library to the filelist that we already created.
We edit the sve.f file that we created during the project-creation process, and add two absolute paths to where we unpacked the UVM bundle:
- +incdir+<uvm_install>/src
- <uvm_install>/src/uvm_pkg.sv
After saving the file, we now have a project without errors.
Results
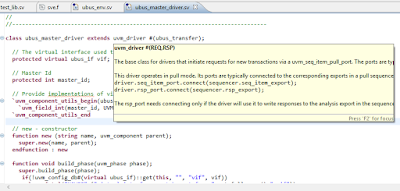
The payoff for properly configuring our SystemVerilog source project is that we can more-productively work with our SystemVerilog sources. In the screenshot above, the hover pop-up is displaying the documentation for the uvm_driver class.
In future blog posts I'll dig into more features of Eclipse, DVKit, and plug-ins like SVEditor. For now, just a reminder that you can always download the completely open source DVKit here.

