FWRISC: Creating a Unit-test Safety Net
15 Dec 2018When developing software, I've become very comfortable with test-driven development -- a methodology that calls for tests to be developed along with, or even before, functionality. It's quite common for me to develop a test first, which obviously fails initially, and implement functionality until the test passes.
I have typically approached hardware verification from a very different perspective. When doing verification, I've typically started with a hardware block that is largely functional, or at least is believed to be largely functional. My work then begins with test plan development and some detective work to ferret out the potentially-problematic areas of the design that require targeted tests.
When developing the FWRISC RISC-V core, I initially started off taking a verification approach. One of the requirements for the RISC-V contest was that cores must pass the RISC-V Compliance Tests. So, I started off by attempting to run one of the compliance tests. I quickly realized that there were some challenges with this approach:
- Even for testing a simple feature, the RISC-V compliance tests are quite complicated. All involve exception instructions. All involve multiple instructions that are unrelated to the instruction that is ostensibly the target of the test. This isn't uncommon for verification, of course.
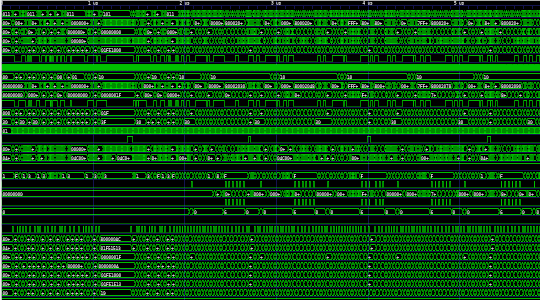
- Taking a verification approach early in the development cycle means that debugging is incredibly painful. Tracking down a small issue with the core by looking at the test result of a test that consists of a hundred or so instructions is incredibly painful -- just see the waveform at the top of this blog post which comes from the test for the 'add' instruction.
- In contrast, see the following waveform that shows the entire 'add' unit test. While it's longer than a single instruction, this test consists of a total of 6 instructions. This means that there's much less to look at when a problem needs to be debugged.
Creating a Testbench
My verification background is SystemVerilog and UVM, so one early complication I faced when developing tests for the Featherweight RISC core was that the RISC-V soft-core context explicitly required the use of Verilator as a simulator. Verilator is, in some senses, a simulator for the synthesizable subset of SystemVerilog. In other senses, it's a Verilog to C++ translator that can be used as to create a C++ version of a synthesizable Verilog description to bind in to a C++ program. Compared to a simulator, think of it, not as a house, but as a pile of lumber, tools, and a blueprint from which you can build a house (which, by the way, is in no way an attempt to minimize the value of Verilator -- just point out some of the required legwork).
The fact that Verilator produces a C++ model of the SystemVerilog RTL brought to mind the unit-testing library that I invariably use when testing C++ code. Googletest is a very handy library for organizing and executing a suite of C++ unit tests:
- Collects and categorizes tests
- Enables common functionality to be centralized across tests
- Provides result-checking macros/assertions
- Executes an entire test suite, a subset, or a single test
- Reports test status
In addition to using Googletest for standard C++ applications, I had used the Googletest framework to manage some early device firmware written in C when testing it against Verilog RTL being verified in a UVM testbench. This approach seemed close enough to what I was looking to do with Featherweight RISC and Verilator that I ended up extending that project (named googletest-hdl) to support Verilator. While the contest required the use of Verilator, I wanted to setup my basic test suite such that it could run with other simulators. Since the googletest-hdl project already supported running with SystemVerilog and UVM, I was covered there.
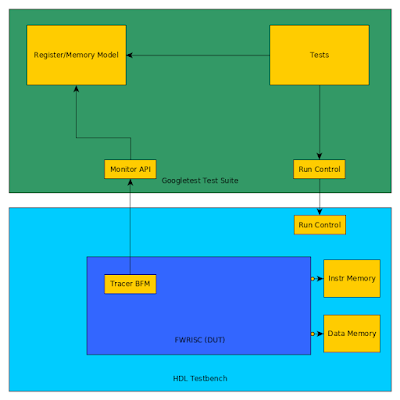
The Featherweight RISC testbench block diagram is shown below:
The design is instantiated in the HDL portion of the testbench. This testbench portion will run in Verilator or another Verilog simulator. The Googletest portion of the testbench contains the test suite and code needed to check test results. There are two points at which the environments communicate: the run-control path by which the Googletest environment instructs the HDL environment to run, and the tracer API path by which events are sent from the processor to the testbench environment.
The tracer API path is the key to checking test results. The following events are sent to the Googletest environment as SystemVerilog DPI calls:
- Instruction-execution event
- Register-write event
- Data-access event
Now that we have this testbench structure, we can create some tests.
Creating Tests
When it comes to unit tests, I usually find that the initial test structure is successively refined as I discover more and more commonality between the tests. Frankly, the ideal unit test is almost-entirely data driven, and the Featherweight RISC tests are very close to this ideal.
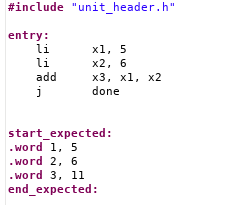
The unique aspects of the instruction unit tests are stored in the test files themselves. Here is test for the add instruction:
- Note the instruction sequence to load registers with literals and perform the 'add'. This is the actual test.
- The data between 'start_expected' and 'end_expected' contains the registers that are expected to be written. The test harness will read this data from the compiled test.
This data-driven test allows our test harness to be fairly simple and completely data driven, as shown below:
- First, the test harness executes the simulation by calling GoogletestHdl::run()
- Next, the test harness reads in the compiled test file, which has been specified with the +SW_IMAGE=<path> option
- The start_expected..end_expected range is located and read in
- Finally, the register contents are checked against the expected values specified in the test.
Results
After getting the unit-test structure in place, I almost-literally went down the list of RISC-V RV32I instructions and created a test for each as I implemented the instruction. The completed tests provided a nice safety net for catching issues introduced as new instructions were implemented, and as bugs were corrected. More issues were found as the RISC-V compliance tests were brought up and these issues prompted creation of new unit tests.
The unit-test safety net has been incredibly helpful in quickly identifying regressions in the processor implementation, and helping to identify exactly which instructions are impacted. The unit-test experience also got me thinking about formal verification, and whether this could also be used as a form of unit-test suite. I'm getting ready to take another pass at shrinking the area required for the Featherweight RISC-V, and am thinking about creating a Formal unit-test suite to help in catching bugs introduced by that work. I'll talk about those experiments in a future post.
For now, I have a suite of 67 unit tests and 55 RISC-V compliance tests that provide a very good safety net to catch regressions in the Featherweight RISC implementation.
Disclaimer
The views and opinions expressed above are solely those of the author and do not represent those of my employer or any other party.


